FAQ Overview
General information
Where to buy VisiQuick?
applies to: all versions of VisiQuick.
Question:
- I like to get more information about purchasing VisiQuick. Where can I get this information?
Answer:
- Check our website for a VisiQuick reseller list.
Author:
Last update: 2016-10-03 10:48
What are the system requirements for VisiQuick?
applies to: all versions of VisiQuick.
Question:
- What are the system requirements for VisiQuick?
Answer:
VisiQuick is a Windows application. To be able to work with VisiQuick your computer needs some minimal system requirements. Your digital devices can have other requirements than what is mentioned here.
Recommended system specifications:
- Windows 7, or higher
- Dual-core CPU
- 4 GB internal memory (RAM)
- monitor resolution 1280 x 1024 or higher, 32bit color
- DVI/HDMI/DP monitor cable
- Gigabit network
- For more grayscale levels, select a monitor with IPS or PA technology
Author:
Last update: 2016-10-03 10:49
Which digital X-Ray and camera systems are supported by VisiQuick?
applies to: all versions of VisiQuick.
Question:
- Which digital X-Ray and camera systems are supported by VisiQuick?
Answer:
VisiQuick supports a lot of different digital X-Ray and camera systems, see:
Author:
Last update: 2016-10-03 10:50
Which digital Phosphor Plate Scanners are supported by VisiQuick?
applies to: all versions of VisiQuick.
Question:
- Which digital Phosphor Plate Scanners are supported by VisiQuick?
Answer:
- See below for a complete list of digital Phosphor Plate Scanners supported by VisiQuick.
| Manufacturer / Brand |
Scanner |
From VisiQuick version |
| 3Disc Imaging |
FireCR dental Reader |
3.0.1.659 |
| Acteon (Sopro) |
PSPIX |
3.0.1.585 |
| |
new PSPIX (PSPIX2) |
- |
| Apixia |
PSP Scanner |
- |
| CareStream (Kodak) |
CS 7200 Scanner |
3.0.1.686 |
| |
CS 7400 Scanner |
- unknown |
| |
CS 7600 Scanner |
- |
| Digident |
Paxorama 2000 |
- |
| Dürr Dental |
VistaScan Combi View |
- |
| |
VistaScan Mini Plus |
- |
| |
VistaScan Mini View |
- |
| |
VistaScan Perio Plus |
- |
| Gendex |
Denoptix |
- |
| |
Denoptix QST |
- |
| |
GXPS-500 |
- unknown |
| Instrumentarium |
Express |
3.0.1.585 |
| |
Express Origo |
- |
| KaVo |
KaVo Scan eXam |
- |
| |
KaVo Scan eXam One |
- |
| Planmeca |
ProScanner |
- |
| Soredex (Digora) |
Digora Optime Classic |
- |
| |
Digora Optime |
- |
| |
Digora Optime UV |
- |
Author:
Last update: 2016-10-03 10:52
Which X-Ray sensors are supported by VisiQuick?
applies to: all versions of VisiQuick.
Question:
- Which X-Ray sensors are supported by VisiQuick?
Answer:
- See below for a complete list of X-Ray sensors supported by VisiQuick.
LIST WILL BE COMPLETED SOON
| Manufacturer / Brand |
Sensor |
From VisiQuick version |
| |
|
|
| Dexis |
Platinum Sensor |
- |
| |
|
|
| - |
MDX3 (E2V3) |
- |
| |
|
|
| Planmeca |
Dixi3 |
- |
| |
ProSensor |
- |
| Progeny (Cygnus) |
ClearVision |
- |
| Soredex (Digora) |
Digora Toto |
- |
| |
|
|
| Vatech |
EzSensor |
- |
| |
|
|
| |
|
|
| |
|
|
Author:
Last update: 2016-10-03 11:09
Which PAN, CEPH, 3D devices are supported by VisiQuick?
applies to: all versions of VisiQuick.
Question:
- Which PAN, CEPH, 3D devices are supported by VisiQuick?
Answer:
- See below for a complete list of PAN, CEPH, 3D devices supported by VisiQuick.
LIST WILL BE COMPLETED SOON
| Manufacturer / Brand |
Device |
From VisiQuick version |
| Ajat |
ART Plus |
- |
| |
ART Plus C |
- |
| Asahi |
Auge Solio |
- |
| |
Cypher-E |
- |
| |
Hyper-GCM |
- |
| Carestream (Kodak) |
CS 8100 |
- |
| |
CS 9000 |
- |
| |
CS 9000C |
- |
| |
CS 9000 3D |
- |
| |
CS 9000C 3D |
- |
| |
CS 9300 |
- |
| Morita |
3D Accuitomo 170 |
- |
| |
Veraview IC5 HD |
- |
| |
Veraviewepocs 2D |
- |
| |
Veraviewepocs 3D F40 |
- |
| |
Veraviewepocs 3D R100 |
- |
| |
|
|
| MyRay |
Hyperion MRT |
- |
| |
Hyperion X5 |
- |
| |
Hyperion X7 |
- |
| |
Hyperion X9 |
- |
| |
|
|
| Soredex (Digora) |
CRANEX 3Dx |
- |
| |
CRANEX 3D |
- |
| |
CRANEX 3D for ENDO |
- |
| |
CRANEX D |
- |
| |
CRANEX Novus Classic |
- 3.0.1.536 |
| |
CRANEX Novus e |
- |
| |
SCANORA 3Dx |
- |
| |
SCANORA 3D |
- |
| Sirona |
Orthophos XG-3 |
- |
| |
Orthophos XG-5 |
- |
| |
Orthophos SL |
3.0.1.698 |
| |
Xios |
- |
| |
Supreme |
- |
| |
Select |
- |
Author: Herman Fröberg
Last update: 2016-08-31 11:56
Which intraoral video cameras are supported by VisiQuick?
applies to: all versions of VisiQuick.
Question:
- Which intraoral video cameras are supported by VisiQuick?
Answer:
- See below for a complete list of intraoral video cameras supported by VisiQuick.
LIST WILL BE COMPLETED SOON
| Manufacturer / Brand |
Camera |
From VisiQuick version |
| Carestream (Kodak) |
CS1200 |
600 |
| Carestream (Kodak) |
CS1500 |
600 |
| MyRay |
C-U2 |
- |
| Soredex (Digora) |
Digora Vidi |
- |
| Winus |
WIN-100D |
- |
| |
|
|
| |
|
|
| |
|
|
| |
|
|
| |
|
|
| |
|
|
| |
|
|
| |
|
|
Author: Herman Fröberg
Last update: 2018-07-03 10:54
Which units with integrated video camera are supported by VisiQuick?
applies to: all versions of VisiQuick.
Question:
- Which units with integrated video camera are supported by VisiQuick?
Answer:
- See below for a complete list of units with integrated video camera supported by VisiQuick.
LIST WILL BE COMPLETED SOON
| Manufacturer / Brand |
Unit |
From VisiQuick version |
| |
|
|
| |
|
|
| |
|
|
| |
|
|
| |
|
|
| |
|
|
| |
|
|
| |
|
|
| |
|
|
| |
|
|
| |
|
|
Author: Herman Fröberg
Last update: 2015-10-14 13:23
General information » Conversions
Digora Solid database
To copy a Digora Solid database, both the Solid files, and possibly, the image folders must be copied.
The Solid files can either be found in the Backup folder inside the Solid server folder, but first check that the files are recent and have the same size as the active Solid files. If the Backup folder does not contain useful files, you must copy the active files, but that can only be done after stopping the Solid service. Stopping the Solid service requires that all Digora For Windows clients are closed first.
If the Digora database is using external media, it has one or more image folders containing lots of small files. These image folders can always be copied, but since there are many small files, they must also be zipped/rarred, if uploaded.
Author: Thomas Jensen
Last update: 2019-11-23 12:49
CliniView & Scanora database
To copy a CliniView database, both the SQL Server database files or backup, and the image folders must be copied.
To get the SQL files, either create a backup using MS SQL Studio Manager, or detach the files, then copying from Program files, then reattaching them (detaching the SQL files requires that all CliniView clients are closed first).
The image folders can always be copied, but since there are many small files, they must also be zipped/rarred, if uploaded.
Author: Thomas Jensen
Last update: 2021-03-30 10:31
Sidexis SQL database
To copy a Sidexis SQL database, both the SQL Server database files (PDATA_SQLEXPRESS) or its backup, and the image folders (PDATA) must be copied.
To get the SQL files, either create a backup using MS SQL Studio Manager, or detach the files, then copying from Program files, then reattaching them (detaching the SQL files requires that all Sidexis clients are closed first).
The image folders can always be copied, but since there are many small files, they must also be zipped/rarred, if uploaded.
Author: Thomas Jensen
Last update: 2021-03-30 10:36
Schick Dicom & Onepix database
To copy a Schick Dicom or Onepix database, both the SQL Server database files or backup, and the image folders must be copied. To get the SQL files, either create a backup using MS SQL Studio Manager, or detach the files, then copying from Program files, then reattaching them (detaching the SQL files requires that all Schick / Onepix clients are closed first).
There can be multiple locations of image folders, such as locations on two disks, so all locations must be copied.
The image folders can always be copied, but since there are many small files, they must also be zipped/rarred if uploaded.
Author: Thomas Jensen
Last update: 2021-03-30 10:35
Dimaxis Solid database
To copy a Dimaxis Solid database, the Solid files must be copied.
The Solid files can either be found in the Backup folder inside the Solid server folder, but first check that the files are recent and have the same size as the active Solid files. If the Backup folder does not contain useful files, you must copy the active files, but that can only be done after stopping the Solid service. Stopping the Solid service requires that all Dimaxis clients are closed first.
Author: Thomas Jensen
Last update: 2021-03-30 10:32
Kodak & Carestream database
To copy a Kodak or Carestream database, the image folders must be copied.
The image folders can always be copied, but since there are many small files, they must also be zipped/rarred, if uploaded.
Author: Thomas Jensen
Last update: 2019-05-27 10:39
Romexis database
To copy a Romexis database, both the SQL Server database files or backup, and the image folders must be copied. To get the SQL files, either create a backup using MS SQL Studio Manager, or detach the files, then copying from Program files, then reattaching them (detaching the SQL files requires that all Romexis clients are closed first).
The image folders can always be copied, but since there are many small files, they must also be zipped/rarred, if uploaded.
Author: Thomas Jensen
Last update: 2021-03-30 10:35
Sopro Imaging database
To copy a Sopro Imaging database, the image folder must be copied.
The image folders can always be copied, but since there are many small files, they must also be zipped/rarred, if uploaded.
Author: Thomas Jensen
Last update: 2019-05-27 10:39
Vixwin database
To copy a Vixwin database, the image folder must be copied. It is very important the image filedate isn't changed. Best practice is to zip/rar the image folders, before uploading.
Author: Thomas Jensen
Last update: 2021-12-01 09:39
DbsWin database
To copy a DbsWin database, both the database files or the backup files, and the image folders must be copied. All the data is in the PR1 folder.
The image folders can always be copied, but since there are many small files, they must also be zipped/rarred, if uploaded.
Author: Thomas Jensen
Last update: 2019-05-27 10:40
Digora MDB database
To copy a Digora MDB database, both the MDB database file, and (possible) the image folders must be copied.
The image folders can always be copied, but since there are many small files, they must also be zipped/rarred, if uploaded.
Author: Thomas Jensen
Last update: 2021-10-22 10:12
Emago database
Copy all files and folders in the "patients" folder.
The patient folder can always be copied, but since there are many small files, they must also be zipped/rarred, if uploaded.
Author: Piet Reijers
Last update: 2019-05-27 10:40
NovaX database (Complan)
To copy a NovaX database, both the database files, and the image folder ("patienten") must be copied. The database files can be in the Data folder (Pervasive, lots of BTR files), just copy it, or in SQL SERVER: either create a backup using MS SQL Studio Manager, or detach the files, then copying from Program files, then reattaching them (detaching the SQL files requires that all Novadent clients are closed first).
The image folder can always be copied, but since there are many small files, they must also be zipped/rarred, if uploading.
Author: Thomas Jensen
Last update: 2021-03-30 10:34
Mediadent database
To copy a Mediadent database, the patient folder must be copied.
Best practice is to zip/rar the entire patient folder and upload it.
Author: Herman Fröberg
Last update: 2019-11-21 17:09
ExquiRay database (Pervasive)
To copy an ExquiRay database in Pervasive format, both the SQL Server database files or backup, and the image folders must be copied.
To get the SQL files, locate that server Exquise data folder and copy at least Patient.xq5 and ExquiRay.xq5 (sometimes, copying the SQL files requires that all Exquise clients are closed first).
The image folders can always be copied, but since there are many small files, they must also be zipped/rarred, if uploaded.
Author: Thomas Jensen
Last update: 2021-03-30 10:33
Installation » VisiQuick
How to install a VisiQuick update?
applies to: all versions of VisiQuick.
Author: Herman Fröberg
Last update: 2016-09-30 09:03
How to install a (new) VisiQuick license?
applies to: all versions of VisiQuick.
Question:
- I have received, by email, a (new) VisiQuick license file. How to install it?
Answer:
- Save the license file to a recognizable location.
- Start VisiQuick.
- Open "Application settings" window by clicking in the Menu on "Tools" -> "Application settings...".
- Select the "License" tab.
- Click on the "Import license..." button. This will open the standard Windows File Open dialog.
- Browse to the location where you saved the license file.
- Open the license file.
Author: Herman Fröberg
Last update: 2016-09-26 15:35
Installation » VisiQuick » External programs
Enabling API Integration in 3Shape Dental Desktop
- In Dental Desktop with the Dental Desktop API Integration module installed (please check under More > Subscriptions), go to More > Settings > Dental Desktop API Integration > General Settings and click Enable next to Dental Desktop API Integration. If a confirmation dialogue appears, click Yes to allow DentalDesktopLauncher.exe to make changes to your device.
- In the appeared login window, enter the credentials of the Dental Desktop user which is used for the integration (see the note below) and click Yes.
- Save changes for the integration to take effect.
- Important note:
It’s recommended to create a separate user in Dental Desktop for integration purposes. After the user has been created, close and then reopen Dental Desktop to be able to use this newly created user.
Author: Udo Brom
Last update: 2021-11-18 10:45
3Shape Dental Desktop link
Configuration
To enable 3Shape Dental Desktop linking read this
At each workstation where the link is needed:
- Start VisiQuick and goto "Tools" --> "External application settings..." --> "Special programs"
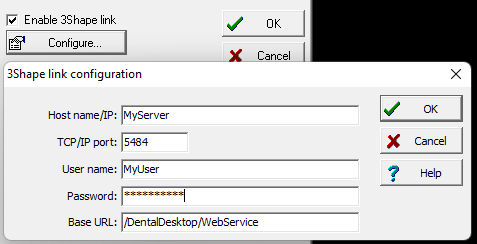
- Check "Enable 3Shape link"
- Click "Configure..."
- Fill in at least the "Host name/IP", "User name" and "Password" fields.
Use
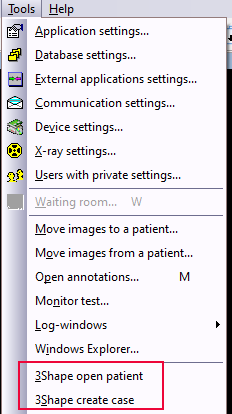
- To open a patient in Dental Desktop open a patient in VisiQuick and click "Tools" --> "3Shape open patient"
- To create a new case in Dental Desktop open a patient in VisiQuick and click "Tools" --> "3Shape create case"
Author: Udo Brom
Last update: 2021-11-30 15:12
Installation » VisiQuick » Footpedals
How to configure the Kavo ErgoCam camera in VisiQuick?
Requirements
- VisiQuick version 3.0.1.631 or higher.
- Kavo ERGOcam
- CCCDIS with support for VirtualCom2 and Kavo ERGOcom3 protocol
Configure CCCDIS
- Click on the CCCDIS icon in the taskbar.

- The "Configure CCCDIS" window is shown:

- Ensure the "Activate VirtualCom2" checkbox is checked.
- Click on the
 button
- The "VirtualCom2 " window is shown:

- Make a note of the COM port number.
- Make sure in the "selected software interface" the "ERGOcom 3 classic" product is selected. If not click on the "select" button and choose it.
- Click the "Close" button to close the window.
Configure VisiQuick
- Start VisiQuick and open a patient
- Take out the camera.
- Open the video window.
- Click "CFG" ==> "Drivers" ==> "Sopro UsbCam". Click "OK" to ignore the error message.
- Click "CFG" ==> "Source". The "Select DV-device" window appears.
- Select the Kavo camera device and click "OK" to close the "Select DV-device" window.
- Click the "Stop" button to close the video window.
- Put back the camera
- Click "Tools" --> "Device settings...". The "Device settings" window appears.
- Select the "Foot pedal" page.
- Select for "pedal type" the "Kavo ERGOcom" device.
- Enter the comport number of the Kavo Ergocam in the "Comm parameters" edit field. For comm port 99 will the string be "com99:1200,E,7,1"

- Click "OK" to close the "Device settings" window
- When the camera is taken out the video window should appear.
- When the camera is put back the video window should close.
Author: Udo Brom
Last update: 2016-02-25 11:14
Troubleshooting » Error message
I get a "Patient's birth date is improperly formatted" error. What can I do to correct this?
applies to: all versions of VisiQuick before release 2015.1 build 686.
Issue:
- When opening a patient in VisiQuick the error message "Patient's birth date is improperly formatted" is displayed.
Solution:
- Close VisiQuick.
- Open Windows Control Panel.
- Click on "Region and Language".
- On the Formats tab, select another "Format".
- Click "Apply".
- Reselect the original "Format".
- Click "OK" to save the format and close the "Region and Language" window.
- Open VisiQuick.
Author: Herman Fröberg
Last update: 2015-10-06 11:12
I get ".... An error occurred while attempting to initialize the Borland Database Engine (error $210D)" error. What can I do to correct this?
applies to: all VisiQuick versions using the BDE engine.
Issue:
- An Application Error dialog is displayed with ".... En error occured while attempting to initialize the Borland Database Engine (error $210D)"
This error is caused by a conflict when launching multiple BDE-applications, eg: VisiQuick, ScanBar, ...
Solution:
- Close VisiQuick (and verify with Task Manager no VisiQuick processes are still running).
- Write down your computers internal memory size (2 Gb, 4 Gb, 8 Gb).
- Open Windows Control Panel.
- Start BDE Administrator.
- Open Configuration tab, Configuration > System > INIT.
- Alter SHAREDMEMLOCATION and SHAREDMEMSIZE, depending on your computers internal memory size:
- 2 Gb: SHAREDMEMLOCATION: 0x2BDE and SHAREDMEMSIZE: 2048
- 4 Gb: SHAREDMEMLOCATION: 0x5BDE and SHAREDMEMSIZE: 4096
- 8 Gb: SHAREDMEMLOCATION: 0x7BDE and SHAREDMEMSIZE: 8192
- Save your changes by clicking on "apply" (the blue arrow).
- Restart VisiQuick
Additional:
When BDE Administrator freezes when applying your changes you need to run it with elevated privileges. To do so, find bdeadmin.cpl in System32 and Run as Administrator.
Author: Herman
Last update: 2016-10-14 13:35
Floating point error activating Owandy PAN/CEPH
Owandy SDK: OSP 4.7.1
OS: Windows 10, 64 bits
Solution:
Install VisiQuick 3.0.1.709 or newer
Author: Udo Brom
Last update: 2021-03-31 10:10
Installation » VisiQuick » Intraoral video cameras
How to install (and configure) a MyRay C-U2 intraoral camera in VisiQuick?
- Remove "MyRay Monitor" from Windows startup
- Close "MyRay Monitor" and "TwainToDisk" (if started)
- Start VisiQuick
- Tools --> Device settings --> Video
- Add "MyRay C-U2 camera"
- Configure its settings.
- Select source:
- For iCapture: "iCapture RGB Interface"
- When starting for the first time the default device should be configured if it is not the camera. For this click the bottom right dropdown arrow. Click on the configure icon on the left. Double click the camera device to select it.
Notes:
- When using VisiQuick 3.0.1.686 install VqHotfix_VideoButtons_686_101.exe (To avoid RGB color swap)
- The MyRayMonitor and TwainToDisk program should not be running when clicking the video button in VisiQuick. Otherwise VisiQuick can get a "Device busy" error when clicking the video button.
- MyRay Twain driver crashes when started (Windows 10). In the Windows event viewer the module causing the crash is "igdumdim32.dll" in the Windows System32 folder (SysWOW64 for Windows 64 bits). To solve the problem rename "igdumdim32.dll" to for example "igdumdim32.dllx"
- When the buttons does not work in the MyRayTwain driver then try to run the MyRayMonitor once as admin user.
Author: Udo Brom
Last update: 2018-09-20 10:18
How to install (and configure) an intraoral camera with an Empia 28xx chipset in VisiQuick?
applies to: all versions of VisiQuick.
Camera names:
- Winus 100D
- PointNix Poscam USB
- Al Dente iCam
- Soredex Vidi
- Panasonic
| VisiQuick version |
Windows version
|
camera button supported |
Installation
|
| 3.0.1.631 and lower |
Windows XP or higher |
no |
- |
| 3.0.1.632 up to 3.0.1.687 |
Windows XP |
yes |
Install method 1 |
| |
Windows 7 32-bits |
yes |
Install method 1 |
| |
Windows 7 64-bits |
no |
- |
| |
Windows 8 and higher |
no |
- |
| 3.0.1.688 and higher |
Windows XP up to Windows 7 |
yes |
Install method 2 |
| |
Windows 8 and higher |
yes |
Install method 3 |
Author: Udo Brom
Last update: 2018-09-20 10:19
MyRay TWAIN devices (iCapture)
iCapture TWAIN sources:
- "iCapture Standard Interface" ==> use last device chosen in MyRayMonitor/iPCapture (If no device has been selected yet, a popup window will ask the user for a device).
- "iCapture Generic Interface" ==> Always displays a popup window where the user has to choose a device.
- "iCapture RGB Interface" ==> Use the last video device chosen in MyRayMonitor.
- "iCapture XRAY interface" ==> Seems not to work for Hyperion X-9 (No devices in selection window)
Author: Udo Brom
Last update: 2015-11-20 10:58
How to configure a VistaCam Pressure Sensitive camera
The Duerr VistaCam Pressure Sensitive is an intra oral camera. The camera can be used using the VisiQuick video window.
Installation
- Please ensure that Windows installs the Video driver named "Duerr VistaCam Imaging" and not "USB 2820 Video"
- The Vistacam Usb camera has two virtual COM ports. One COM port is used to receive footpedal commands from the pressure sensitive ring. The other is used to set the pressure sensitive parameters and to switch on/off the video. For the wireless version of the camera the second COM port does not exist.
- Configure footpedal COM port:
- Start VisiQuick.
- Open the "Device Settings" dialog.
- Select the "Footpedal" tab.
- Select the "VistaCam Pressure Sensitive" Pedal type (for not wireless) or "VistaCam USB" (for wireless).
- Lookup in the device manager of windows what COM port number is for the footpedal (=pressure sensitive ring).
- Fill the parameter in in 'Commparameters'. Change the 'com1:....' string by for example 'com8:....' when COM 8 is the foot pedal port.
- Press 'Comm port connected'.
- Configure the pressure sensitive button (not wireless only):
- Start VisiQuick.
- Open the "Device Settings" dialog.
- Select the "Footpedal" tab.
- "VistaCam Pressure Sensitive" Pedal type should be selected.
- Click the pedal configure button.
- Set the default settings:
- "Enable button" on.
- Set "Delay" to 0
- Set "Sensitivity" to 250.
- Set "Threshold" to 1024.
- Click "Update" and then "Close".
- Test the button by pressing it and noticing the button events.
- To configure the video in VisiQuick follow these steps:
- Open a patient.
- Click the Video button.
- Click "Cfg"-->"Drivers" and select "VistaCam Usb".
- Click "Cfg"-->"Source" and select "Duerr VistaCam Imaging".
- Click 'L" for live video.
- Click "Cfg" and turn on "Stretch to fit".
Usage
To open the video window, do one of the following:
- Click the Video button.
- Press F11.
To save an image, do one of the following:
- Press the button on the camera.
- Click the Save button.
- Press F8.
Author: Udo Brom
Last update: 2016-02-16 13:10
How to configure the Kavo ErgoCam camera in VisiQuick?
Requirements
- VisiQuick version 3.0.1.631 or higher.
- Kavo ERGOcam
- CCCDIS with support for VirtualCom2 and Kavo ERGOcom3 protocol
Configure CCCDIS
- Click on the CCCDIS icon in the taskbar.
- The "Configure CCCDIS" window is shown:
- Ensure the "Activate VirtualCom2" checkbox is checked.
- Click on the button
- The "VirtualCom2 " window is shown:
- Make a note of the COM port number.
- Make sure in the "selected software interface" the "ERGOcom 3 classic" product is selected. If not click on the "select" button and choose it.
- Click the "Close" button to close the window.
Configure VisiQuick
- Start VisiQuick and open a patient
- Take out the camera.
- Open the video window.
- Click "CFG" ==> "Drivers" ==> "Sopro UsbCam". Click "OK" to ignore the error message.
- Click "CFG" ==> "Source". The "Select DV-device" window appears.
- Select the Kavo camera device and click "OK" to close the "Select DV-device" window.
- Click the "Stop" button to close the video window.
- Put back the camera
- Click "Tools" --> "Device settings...". The "Device settings" window appears.
- Select the "Foot pedal" page.
- Select for "pedal type" the "Kavo ERGOcom" device.
- Enter the comport number of the Kavo Ergocam in the "Comm parameters" edit field. For comm port 99 will the string be "com99:1200,E,7,1"
- Click "OK" to close the "Device settings" window
- When the camera is taken out the video window should appear.
- When the camera is put back the video window should close.
Author: Udo Brom
Last update: 2016-02-25 11:14
How to integrate Sirona Teneo/Sinius IO camera in VisiQuick?
VisiQuick uses SiVision for communicating with the Sirona Teneo and Sinius chairs.
Installation
- Make sure a version of Siucom Plus is installed that includes SiVision. If not it has to be upgraded. (fe: SIUCOM_plus_v1.4.83)
- When installed for the first time the COM client has to be registered: Program Files\Sirona Dental Systems\SIVISION connect\Client\Register.bat. If register.bat is not present it can be downloaded here: ftp://ftp.thomsystems.com/Download/VisiQuick/Drivers/Sirona/SiVision
- In the “SIUCOM plus Einstellungen” window UNCHECK the camera that is used, otherwise VisiQuick will not receive camera events. The camera that is NOT used should be CHECKED.
- Uncheck all applications.
- Close the “SIUCOM plus Einstellungen” window.
- Take the camera out of the chair holder.
- Start VisiQuick (VisiQuick 3.0.1.636 or higher) and open a patient
- Click the camera button. The video window appears
- Click “CFG” ==> “Drivers” and select “Schick/Suni UsbCam”. Ignore the error message.
- Click “CFG” ==> ”Source” and select the driver for the chair camera.
- Click OK. The video should be displayed.
- Close the video window and place the camera back in the holder.
- Click “Tools” ==> “Device settings…”. The “Device settings” dialog appears
- Select the “Foot pedal” page.
- Select “Sirona SiVision” as “Pedal type”.
- Click the button to the right of the pedal type field.
- Select the “Camera name” that is used by the chair.
- Click “OK” to close the device settings dialog
- Take the camera out of the chair holder. The video window in VisiQuick should be displayed.
- Pressing the foot pedal buttons should live/freeze the video or save a snapshot.
- Placing the camera back in the chair holder should close the video window
Dependencies
- SiVisionSdkWrapper.dll (In VisiQuick folder). This file is automatically installed if not present.
Author: Udo Brom
Last update: 2018-09-20 10:19
How to configure an Iris camera
Installation
- Install the setup on the Iris CD according to the documentation. (When asked for the name of the Imaging Software choose for example Apteryx).
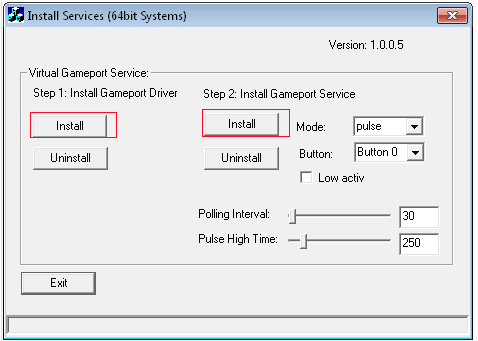
- Drivers for virtual Joystick:
[Iris install folder]\Legacy\InstallVirtGp.exe
- Start VisiQuick
- Start Video window:

- Select “CFG” --> “Drivers” --> “Iris”
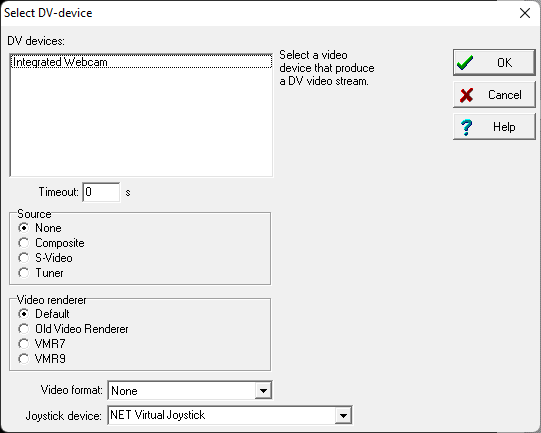
- Select “CFG” --> “Source…”
- Select DV-device “Iris”
- Click OK
Author: Udo Brom
Last update: 2021-12-15 10:25
Installation » VisiQuick » X-Ray devices
Soredex/Instrumentarium IAM version matrix
IAM version
|
IAM SDK version |
dsd.ocx |
dicc.dll |
Problems |
| 5.03.11330 |
|
3.5.2594.0 |
1.7.9.0 |
|
| 4.20.9144 |
|
3.5.2383.0 |
1.6.5.0 |
- Image crop bug Optime/Express (black area around image)
|
| 4.20.7898 |
|
3.5.2308.0 |
1.6.5.0 |
|
| 4.19.7634 |
|
3.5.2298.0 |
1.6.5.0 |
|
| 4.13.6590 |
|
3.5.2271.0 |
1.6.5.0 |
|
| 4.0.3.0002 |
1.3 |
3.3.12.0 |
1.6.4.0 |
|
| 4.0.1.000 |
1.1 |
3.3.9.5 |
1.5.29.0 |
|
| |
1.0 |
3.3.8.11 |
1.5.29.0 |
|
Author: Udo Brom
Last update: 2015-11-10 10:17
How to install a FireCR / Planmeca Proscanner
Notes:
- Romexis installs CrSwing.dll in C:\Program Files\Planmeca\Romexis\client
Author: Udo Brom
Last update: 2016-02-17 15:29
Gendex Visualix sensor
Gendex Visualix GX-S I/O Sensor
Requirements:
| OS |
Gendex GxPicture version |
| Windows XP Professional |
2.51 |
| Windows Vista 32-Bit Business |
2.7.2 |
| Windows Server 2003 |
2.7.2 |
| Other OS |
Not supported |
Configuration:
- Install Gendex GxPicture
- Install VisiQuick
- In VisiQuick click the menu item "Tools" ==> "X-ray setttings..."
- Click the button "New"
- Select for Driver "Gendex" and for Device "Visualix"
Author: Udo Brom
Last update: 2015-12-07 17:02
Workflow for FireCR / Planmeca ProScanner with FireID tag reader
- Open the VisiQuick inform. The statusbar will not turn green if a FireID reader is connected the computer
- Let the inform open and and tag an image plate.
- Walk to the scanner and insert the image plate. The scanner will send the image to the corresponding VisiQuick inform.
Author: Udo Brom
Last update: 2016-02-17 15:20
How to install Sirona Supreme sensor in VisiQuick?
- Install Sidexis.
- Configure Sidexis for using the Supreme sensor
- Copy all files in the folder "Drivers\Dental\Sirona\SDK" from the Visiquick CD to the VisiQuick folder.
- Start VisiQuick
- Click Tools --> X-ray settings...
- Add new device driver "Sirona Device" (driver is "Sirona")
Author: Udo Brom
Last update: 2016-02-22 09:39
How to configure a Vatech device in VisiQuick
Requirements
- Vatech acquisition software installed and working.
- The full path to the Vatech acquisition program (fe: c:\PaxZenith3D\exe\PaXZenith3D.exe).
- The full path to the 2D image output (fe: c:\PaXZenith3D\Result\Single\DCT0001.dcm)
- The full path to the patient info file (fe: PaxZenith3D\user_settings\PaxZenith3D.ini)
- For 3D images also the 3D output directory is required (C:\PaxZenith3D\Result\Multi)
Notes
- Vatech acquisition software is normally installed in a subfolder of the C: drive.
- The acquisition program is located in the 'exe' subfolder or in the root of the Vatech installation folder.
- Look for the main settings file (normally the same name as the acquisition program, but with ini extension). This file is located in the same folder as the acquisition program or in a "user_settings" subfolder. In this main settings file look for the "DB_SAVE_TYPE" section. Here is normally (not always....) the info is were the image will be stored. Check if this is correct.
- The main settings file can also be the file were the patient info is stored (look for "PATIENT_INFO" section). Otherwise search for a file called PatientInfo.ini
- If possible configure the Vatech acquisition software for 2D that it outputs a dicom (dcm) image file. Otherwise there is a big change the calibration info is not in the image. In this case the calibration value should be stored in VisiQuick ("Fixed pixel size" property of the OPG/CEPH button; >=Vq686)
Configuration in VisiQuick
- Start VisiQuick
- Click on Tools -> X-ray settings...
- Add a new device (driver=Vatech; Device=Vatech)
- Configure the device settings.
- For "Filename of acquisition program" enter requirement 2
- Set "SDK info" to "fixed"
- Click the "Configure..." button.
- For "Image filename" enter requirement 3
- For "Ct path" enter requirement 5 (only for 3D)
- For "Patient info filename" enter requirement 4
- Click OK to close the Vatech device configuration and the X-ray configuration dialog.
- Open the inform and test the configuration. Take a Pan, Ceph (if available), 3D (if available) and check that VisiQuick detects the image after closing the Vatech acquisition program.
Author: Udo Brom
Last update: 2016-04-18 11:32
Soredex FMX
Device is not supported starting with DSD 3.3.9.11 (IAM 1.1)
Author: Udo Brom
Last update: 2016-06-20 11:28
Installation » Remote X-ray
Using Digora Optime scanner in Remote X-ray, configuring central locks folder for reserving/locking scanner
When using multiple Remote X-ray server installations in one clinic, all connecting to the same Digora Optime scanner, all Remote X-ray server lock path settings must point to the same locks folder on a file server.
This ensures that, when reserving/locking a Digora Optime scanner via one Remote X-ray server, the other Remote X-ray server can see that.
Author: Thomas Jensen
Last update: 2018-10-08 09:51
Configuring separate X-ray settings per user name
If you want to have the user name control which Remote X-ray device it should connect to, first create as many Remote X-ray connections as there are users needing to use it. Each Remote X-ray connection is configured to the IP-address it should connect to, and has its X turned off (no X-ray button).
Then log in as user 1. Open Tools/Users with own settings and check if user 1 is in the list, and if nbot, click create to create an entry for user 1.
Then open the X-ray settings, and now turn on X on the Remote X-ray connection user 1 should use.
Repeat for user 2 etc.
When you log in with another user name than in the list, the global X-ray button settings are used. When you log in with one of the user names which are in the list, its own buutton settings are used.
Author: Thomas Jensen
Last update: 2018-10-08 10:00
SDB Knowlegde Base (Legacy)
Put back 1 (or more) patients into current database from backup (if for example some of the patient info has been accidentally lost)?
applies to: all versions of VisiQuick
NOTE: The best way to temporarily connect to a backup database differs between VisiQuick 3.x and VisiQuick 4.x an up!
- Finding the database backup and connecting it to VisiQuick you do this by:
- Going to Tools -> Database settings -> Database tab.
- For VisiQuick 3.x: Set the Database path to the backup then click OK.
- For VisiQuick 4.1 and up: Create a new Shared Folder, configure it so it will connect to the backup database.
- Open the patient with all the data.
- Click on the enveloppe in the toolbar:
- Click and drag the missing photo's or choosing all images by pressing the + button;
- Then send a .vqd to a place that can be easily found by pressing the "send to file" button.
- Then set the database path back to the original database.
- For VisiQuick 3.x: Change the Database path back to the original path.
- For VisiQuick 4.1 and up: Set the Shared Folder back to the original path.
- Import the .vqd file by going to File -> Load from file... and choose the .vqd file you saved in step 3b.
Author: Herman Fröberg
Last update: 2021-11-18 10:58